Recessed lighting, also known as can lights, downlights or pot lights, is a clean and modern way to light any room. These lights are mounted into the ceiling, leaving only a thin trim visible, which gives a clean and uncluttered look. Recessed lighting provides even lighting and is perfect for rooms with lower ceilings, modern designs, or areas where you want to focus light in a specific direction, complementing other features like chandelier lights for a layered lighting effect.
In this guide we’ll go through the installation process for both can and canless recessed lights, including the tools, safety precautions and wiring considerations. Whether you’re installing lights in a new room or upgrading your existing lighting, this DIY project is an affordable and easy way to brighten up your space.
What You Need to Know Before Installing Recessed Lighting?
Before you begin installation process, it's essential to consider the following:
1). Choose the Right Recessed Lighting Fixture
There are two types of recessed lighting fixtures: can lights and canless lights. Each has its own installation.
-
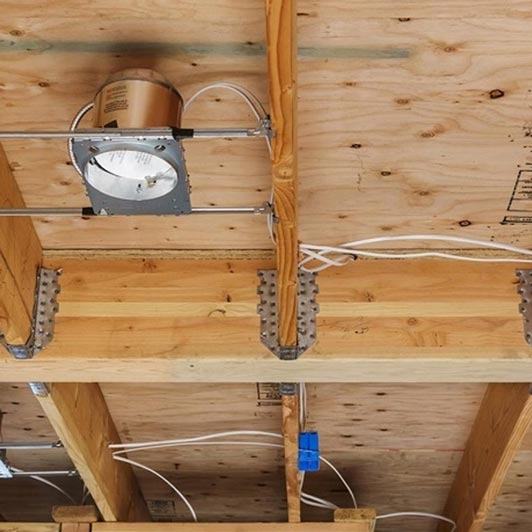
Can Lights: These fixtures are mounted in a metal housing (the “can”), which is in the ceiling. The housing is needed to contain the electrical parts and air flow.
-
Canless Lights: A newer and sleeker option, these don’t need the traditional metal housing. They have the housing and light source all in one unit. Good for shallow ceilings or when you want a more contemporary look.
Also, make sure the fixtures are suitable for the size of your room and ceiling height. Smaller fixtures for focused lighting, larger for general lighting.
2). Understand the Circuit
Recessed lighting can be tied into an existing circuit or require a new circuit to be installed. If you’re extending an existing circuit, make sure the current circuit can handle the extra load. For most 20-amp circuits you can install up to 12 recessed lights.
If you’re running a new circuit it will take longer as you’ll need to run electrical wire from your service panel to the switch and then to each light.
3). Check Local Codes and Permits
Some areas require a permit for electrical work especially if you’re modifying or adding to your existing electrical system. Always check with your local authority to see if you need a permit for this installation.
4). Safety
Electrical work is dangerous so take all necessary safety precautions. Turn off the power at the circuit breaker before you start working on the electrical system. If you’re working above the ceiling use safety equipment, including a breathing mask to avoid inhaling dust or insulation fibers.

Tools and Materials You'll Need
Get these tools and materials before you start. You may need more based on the type of recessed light (can vs canless) you’re installing.
Tools:
-
Stud Finder: To locate ceiling joists and avoid drilling into them.
-
Hole Saw or Jab Saw: To cut holes in the ceiling. For can lights use a hole saw for bigger holes and a jab saw for smaller, less frequent cuts.
-
Wire Ripper and Stripper: To strip insulation off electrical wires.
-
Side-Cutting Pliers: To cut electrical wires.
-
Voltage Tester: To make sure the circuits are off and safe to work on.
-
Drill: To cut bigger holes for can light housings.
-
Breathing Protection & Eye Protection: For working in dusty or high-altitude areas.
Materials:
-
Recessed Light Fixtures (can or canless)
-
Electrical Cable (14-gauge wire)
-
Circuit Breaker (if you’re installing a new circuit)
-
Light Bulbs (for the fixtures you’re using)
Step-by-Step Installation Guide for Both Can and Canless Lights
Step 1: Plan the Light Placement
Before you start, plan where you will place the recessed lights. The placement will determine the overall lighting in the room so take your time.
-
Even Spacing: The rule of thumb is to space your recessed lights 4 to 6 feet apart, depending on the size of the room. For smaller rooms you can space them closer together, but for larger rooms you will want to space them farther apart for more even coverage.
-
Avoid Ceiling Joists: Use a stud finder to find where the ceiling joists are. Recessed lights should be at least 6 inches away from any ceiling joists to avoid hitting the structural framework.
-
Symmetry: Recessed lighting works best when placed symmetrically across the ceiling, pairing beautifully with pendant lighting to create a balanced and versatile lighting setup. Mark the spots with a pencil or masking tape for placement.
This will save you time and hassle later and make sure your recessed lighting is functional and looks good.
Step 2: Cut the Holes for the Fixtures
Now that you have marked the locations for the lights, it’s time to cut the holes in the ceiling. Precision is key, especially with can lights, as the housing has to fit tight.
-
Can Lights: Use a hole saw to cut holes the correct size for the metal housing. When cutting can lights, be precise. Cutting too big of a hole will make it hard to secure the housing.
-
Canless Lights: Since canless lights are smaller and don’t need the big hole, it’s easier. Use a jab saw to cut a hole just big enough for the canless.
Take your time on this step, clean holes are key to a pro finish.
Step 3: Run the Electrical Wiring
Next up is to run the electrical wiring from the power source to each recessed light. Depending on if you’re adding to an existing circuit or installing a new one, this step will be different.
-
Existing Circuit: If you’re connecting to an existing light, open the junction box of the previous fixture and pull the wire through to the new location. This is usually the fastest and least amount of work.
-
New Circuit: For a new circuit, run the electrical cable from the service panel (circuit breaker) to the switch and then from the switch to the first light in the series. Follow local electrical codes and if you’re unsure, always consult a pro.
-
Routing the Cable: Make sure the wiring is routed safely and secured to the ceiling or attic. Use wire staples or clamps to keep the cables in place and from getting damaged.
When running wires through the ceiling, make sure they’re insulated and not exposed to elements or physical damage.
Step 4: Install the Light Housing
-
Can Lights: Put the can housing into the hole you cut in the ceiling. Many can lights have clips or brackets that screw into the drywall. Make sure it’s in there snug but not too tight or you’ll damage the ceiling. Once it’s in, make sure it’s stable and there are no gaps.
-
Canless Lights: For canless lights, just put the fixture in the hole. Since these don’t have an external housing, this step is way faster.
Step 5: Install Trim and Bulb
-
Can Lights: Once the housing is in, attach the trim. The trim ring usually clicks into place around the housing. Some trims are part of the housing, some are separate. Then install the light bulb according to the fixture’s specs.
-
Canless Lights: For canless units, the trim and light source are already integrated. Once the fixture is in, just connect the wiring and make sure everything is secured.
Step 6: Final Wiring
-
Wire the Circuit: If you haven’t done so already, connect the wiring to the circuit breaker. A 15-amp circuit breaker is usually sufficient for residential installs. Make sure all connections are tight.
-
Turn on the Power: Once everything is connected, turn the power back on at the circuit breaker and test each light. If any light doesn’t work, recheck the wiring and make sure everything is correct.
Step 7: Finish and Clean Up
Once all the lights are in and working, clean up the area making sure there’s no debris in the ceiling or on the floor. Make sure the trim rings are in place and there are no gaps between the trim and ceiling.

When to Call a Professional?
While recessed lighting can be a DIY project for those with some experience, there are times when it’s best to call a professional. One of the biggest challenges is running wires through walls, ceilings and attics. These spaces can be tight and navigating wires is hard enough, especially in older homes where the existing wiring may not be up to code. If you don’t know the layout of your home’s electrical system or how to route cables, you can make mistakes that can be hazardous.
Also working with an open service panel or electrical box can be dangerous if you’re not trained. A licensed electrician knows the safety protocols and can avoid common electrical mistakes like overloading circuits or improper wiring which can cause fires or electrical shock. They have the tools and expertise to get the job done right and to code, so the work is safe and legal.
If you’re not sure about electrical work or don’t have the right tools, calling a pro is the way to go. Then you can be sure it will be done right and save yourself the hassle in the future.
Conclusion
Recessed lighting can make a big impact on a room. Whether you’re installing can lights or canless lights, combining them with a brass chandelier can elevate the room’s ambiance to a sophisticated level. By following safety precautions, understanding the wiring and choosing the right fixtures you can get pro looking results without an electrician.
Remember electrical work is complex and dangerous, so if you’re not sure about any part of the process, it’s always better to call a pro to keep your home safe and lit.
Read More:
15 Amazing Small Bedroom Lighting Ideas
15 Bathroom Lighting Ideas Over Mirror
15 Amazing Bathroom Lighting Ideas For Ceiling

